Creative DIY Storage Ideas for Tiny Apartments
Remember when Pinterest first became a thing, and suddenly everyone was turning pallets into everything imaginable? Well, I was one of those eager DIYers, dragging wooden pallets up three flights of stairs to my tiny apartment! After years of trial, and error, and yes, a few disasters (let’s not talk about the floating shelf incident of 2019), I’ve mastered the art of making small spaces both functional and fabulous. Today, I will share my most successful small space solutions that have transformed my tiny apartment into what my friends call a “DIY dream home.”
Let’s face it – storage in small apartments can feel like playing Tetris with your life! When I first moved into my 500-square-foot apartment, I was overwhelmed by the sheer amount of stuff and the distinct lack of places to put it. That’s when I discovered the magic of vertical storage and hidden spaces.
One of my absolute game-changers was creating a floor-to-ceiling pegboard wall in my entryway. I painted it to match my wall color (a lovely sage green), and now it holds everything from my keys and mail to my bicycle and workout equipment. The best part? I can rearrange it whenever I want, and it costs less than $100 to make. Pro tip: Make sure to anchor it properly – I learned this the hard way when my first attempt came crashing down at 2 AM!
The space under furniture is prime real estate that often goes unused. I created custom under-bed storage drawers using old dresser drawers I found on Facebook Marketplace. After adding some caster wheels ($12 at the hardware store), a fresh coat of paint, and waterproof liner, I had perfect storage for off-season clothes and extra bedding. The wheels make it super easy to access everything, and the liner protects against dust and moisture.
Don’t forget about those awkward corner spaces. They’re storage goldmines! I built a corner storage tower using wooden crates arranged in a spiral pattern. Each crate is slightly turned and secured to the ones above and below it, creating a visually interesting piece that holds books, plants, and my embarrassingly large collection of craft supplies. I added small LED lights to each compartment, making it both functional and atmospheric.
Want to know my favorite kitchen storage hack? I installed a ceiling-mounted pot rack using industrial pipes and flanges. It freed up an entire cabinet, and now my copper pots double as decor. Just make sure your ceiling can handle the weight – consult with your landlord or a contractor if you’re unsure.
How to Build a Murphy Desk for Small Spaces
When my boss announced permanent work-from-home options, I nearly panicked. Where would I put a desk in my already cramped space? Enter the Murphy desk – my most practical and satisfying DIY project to date.
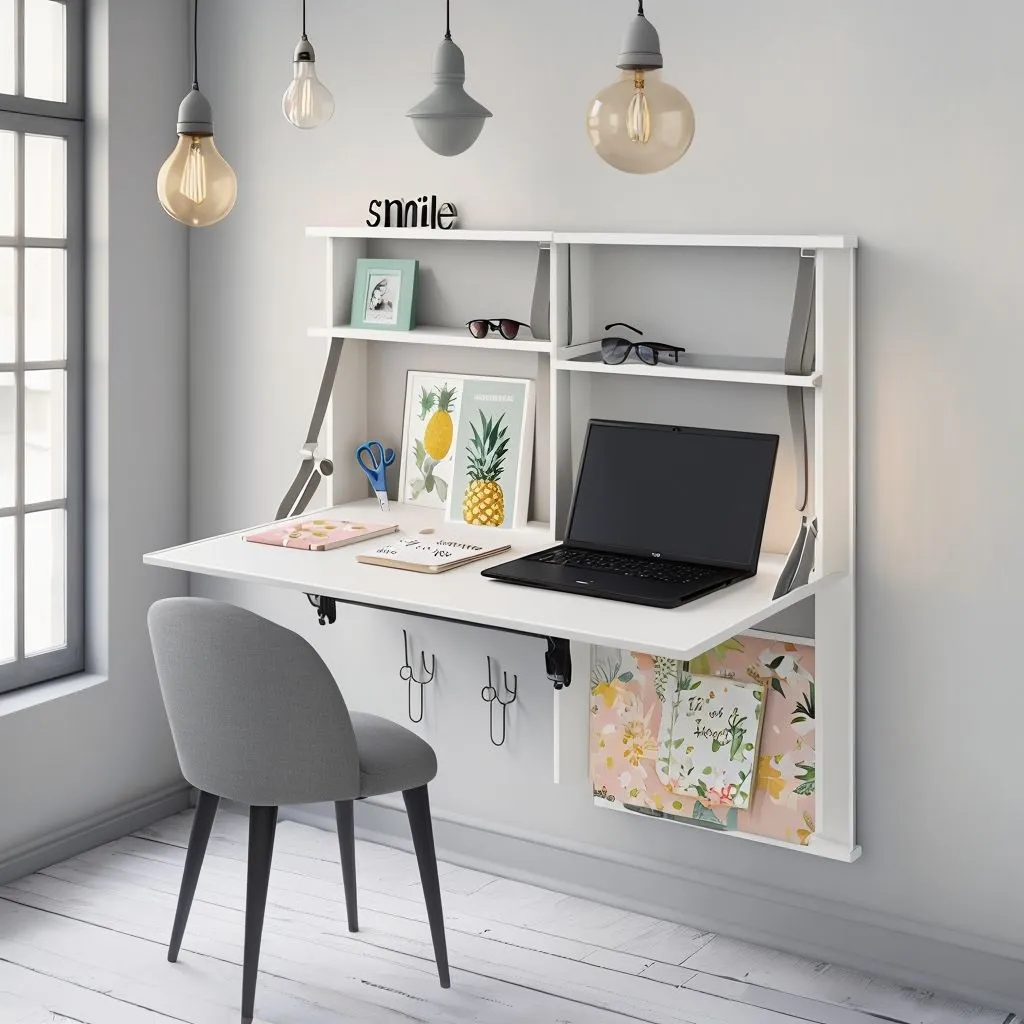
First, let me break down the anatomy of a good Murphy desk. You need a sturdy base (I used 3/4-inch plywood for the desktop), heavy-duty hinges rated for at least 100 pounds, a solid mounting frame, and a reliable locking mechanism. I spent about $75 on materials, which is a fraction of the cost of store-bought versions.
Here’s my step-by-step process:
• Built a frame using 2x4s anchored directly into wall studs
• Created a desktop slightly larger than my laptop and monitor setup
• Added a wire management system using cord clips and a power strip
• Installed gas struts ($20 on Amazon) to make lifting easier
• Built-in storage pockets for office supplies
• Added LED strip lighting for ambiance and functionality
The real genius came in the extras. I covered the back of the desk (which becomes the wall-facing side when closed) with magnetic whiteboard paint. Now I have a planning surface that’s hidden when the desk is in use. I also added a corkboard strip and small shelves to the inside, maximizing storage potential.
One tip I wish I’d known sooner: Add a small ledge at the bottom of your desktop to prevent items from sliding off when you close it. Trust me, picking up scattered paper clips gets old fast!
Multi-functional Furniture Projects for Studio Living
Living in a studio apartment is like playing chess – every piece needs to serve multiple purposes! After three years of studio living, I’ve become a kind of an expert at creating furniture that works as hard as I do.
My pride and joy is what I call my “entertainment center slash workspace slash storage unit.” It started as three IKEA Billy bookcases, but don’t roll your eyes just yet! I connected them with custom bridges I built from plywood, added a fold-down desk in the middle section, and installed sliding panels made from lightweight MDF. Now I have a place that hides my office mess when friends come over, stores all my books and supplies, and even houses my TV on a pull-out swivel mount.
Remember that old trunk I mentioned? Well, it’s become the MVP of my living room. Here’s how I transformed it:
• Reinforced the interior with additional wood supports
• Added foam padding to create a cushioned top
• Installed hydraulic hinges for easy opening
• Created compartments inside for organized storage
• Attached hairpin legs for a mid-century modern vibe
• Added a removable tray top for stable surfaces
The entire project cost around $85, and now I have a coffee table, extra seating, and storage for seasonal items all in one piece!
My rolling kitchen island project was born from necessity (and a tiny kitchen with exactly two feet of counter space). I found an old cabinet at a restore shop for $30, and here’s what I did:
• Added a butcher block top ($60 from a local lumber yard)
• Installed heavy-duty locking wheels
• Created a pull-out cutting board
• Added a towel bar on one end
• Installed a collapsible leaf that doubles my workspace
• Built-in wine storage in the base
The whole thing can be moved anywhere in my apartment, as it has served as a bar for parties, extra counter space when cooking, and even a dining table when I host dinner parties.
DIY Room Dividers: 10 Stylish Solutions
In a studio apartment, room dividers aren’t just about separating spaces – they’re about creating distinct zones while maintaining flow. Let me share my top 10 tested-and-true divider solutions:
1. The Living Wall Divider
I created a stunning plant wall using copper pipes as a frame and a clear fishing line to hang plants at various heights. Tips for success:
• Choose plants that thrive in your light conditions
• Install a drip tray system for easy watering
• Use lightweight plastic pots instead of ceramic
• Add grow lights if necessary
• Include both trailing and upright plants for interest
2. The Bookshelf on Wheels
This was a game-changer for my space! I built a double-sided bookshelf that:
• Has adjustable shelves on both sides
• Includes hidden storage compartments
• Features a built-in cat climbing system (my cat’s favorite part!)
• Moves easily on industrial casters
• Can be locked in place with adjustable feet
3. The Macramé Wonder
My macramé divider became an Instagram favorite! Here’s what made it special:
• Used varying thicknesses of rope for texture
• Incorporated wooden beads for interest
• Created an asymmetrical design
• Added small shelves for air plants
• Used copper pipe for the frame
4. The Multi-Panel Art Screen
This project combined storage and style:
• Built five hinged panels
• Covered them with stretched canvas
• Created abstract art on each panel
• Added hooks on the back for storage
• Made it foldable for easy storage
5. The Light-Filtering Lattice
This divider plays with light and shadow:
• Used PVC pipe to create a modern lattice design
• Added LED strip lighting
• Created removable panels for cleaning
• Incorporated storage cubbies
• Made it height-adjustable
6. The Rotating Cube Storage
Think Rubik’s cube meets room divider:
• Built individual cubes that connect
• Made each cube rotatable
• Added different storage solutions to each side
• Installed lighting in select cubes
• Created a mix of open and closed storage
The remaining four solutions include sliding panels, a folding screen with integrated storage, a suspended rope design, and a modular wall system – each with its unique twist and functionality.
Remember, the key to successful small-space living is creativity and flexibility. Don’t be afraid to try new ideas or modify existing ones to fit your needs. And always keep a good sense of humor – sometimes our “failures” lead to the best solutions!
Want to make these projects even better? Here are my top tips:
• Always make a detailed plan before starting
• Buy quality materials for pieces that get daily use
• Keep your tools organized between projects
• Take lots of progress photos
• Join local DIY groups for support and inspiration
• Start with the easiest version of a project – you can always upgrade later!
What’s your next small space DIY project? Remember, every space has potential – it’s just waiting for your creative touch to bring it to life!
